Windows 7
These pages about Windows 7 are not thought to be a complete instruction. Rather, they refer to specific issues of this operating system.
Click on one of the bars below to get mor information on each topic.


The Windows start menu is involved by clicking on the round button in the bottom left corner (1). At the right side of this button, there is the Windows taskbar (2). In the bottom right corner of the desktop (3), you can find the clock as well as the known tools for e.g. adapting the volume or the charging state of the powerpack (on laptop computers only).
At the rightmost end of the taskbar, you can find the "show desktop" area. Clicking on it will minimize / restore all open windows with just one click.

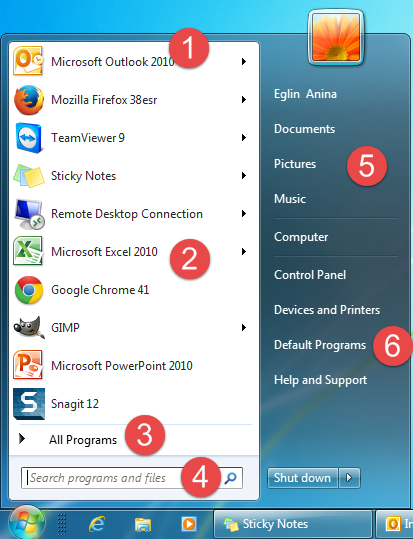
The Windows 7 start menu is divided in two parts as it was before under Windows XP: At the left side, there are the most used applications (2, added automatically by the system) as well as the shortcuts to applications that have been added by the user (1). The right side of the start menu contains again shortcuts to the most important folders (5) and the System properties (6).
The list of "All programs" (3) is newly organized. At first, you see a few single items as well as the categories of the installed software packages. Clicking on these categories displays the according contents.
Finally, there is a input/search field (4).
Searchbox
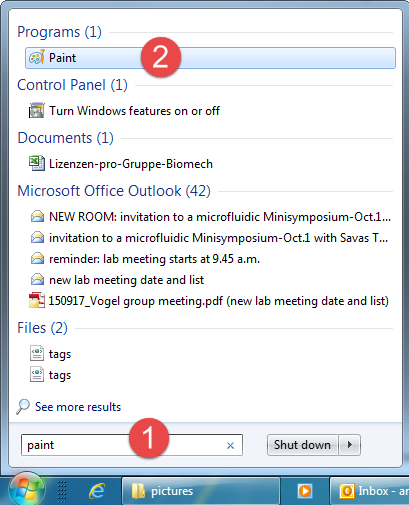
Upon opening the start menu, you can find the search box (1) right above the round button. Entering the name (or part of the name) of an application will display (2) menu entries that contain this name.
This search works also with files or e-mails in Outlook.
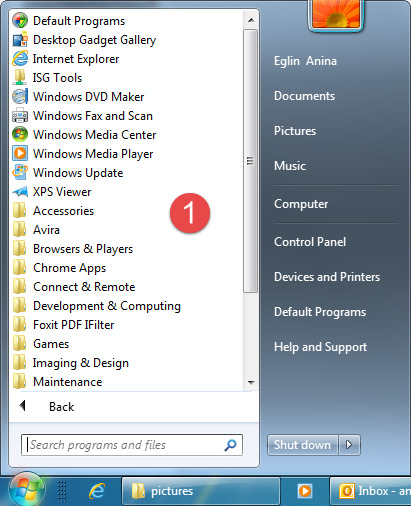
If you click on "All Programs" you can see a folder structur which shows all installed programs as well as all AppV programs that you are signed into over the AppV Kiosk (1).
Jump lists
Jump lists are a new feature in Windows 7. To open a Jump List, just right-click a program icon on the Windows 7 taskbar. Alternatively, you'll find them on the Start menu (1).
What you will find in a jump list depends on the program. For instance, the jump list for Notepad lists the recently opened files. You can make a jump list item permanent by clicking on its pin (2).
NOTE: Not every program supports this new feature!
Achtung: Nicht jede Applikation unterstützt bereits Jump-Listen!

The new Taskbar in Windows 7 joins the shortcut menu and the list of opened windows in one single taskbar. You can add programs to the taskbar by right-clicking the according icon in the start menu and select "Pin to Taskbar".
Programs that were opened through the start menu are as well visible in the taskbar. You can identify the programs that are running by the frame around the icon in the taskbar. If several windows of the same application are opened, Windows 7 draws 2 frames around the icon. To see the opened windows, just move the mouse over the according icon. A preview will be shown (1).

Moving the mouse over such a preview window will fade out all opened windows but the selected one. This window can now be activated by clicking on the preview frame.

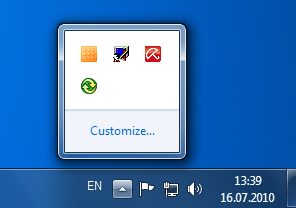
The arrow shaped button at the right side of the taskbar hides the programs that are running in the background, such as AppV, Avira Antivir, or Outlook.
If you want to see this icon directly on the taskbar, simply drag-and-drop it from the "show hidden icons" window to the taskbar. If you want to see all icons directly on the taskbar, select "Customize" and check the "Always show all icons and notifications on the taskbar" checkbox.
Right of this button, you can find the action center, symbolized by a flag. The action center points to errors in the system and might help in solving the according problems. For example, Windows 7 informs about an out-of-date antivirus protection and supports its updating.
The clock has been redesigned. Now you get a calendar view when clicking on the clock.
The Control Panel has not changed much since Windows XP. By default, the issues are categorized in themes. You can switch to classic view by clicking "Small icons" (1) in the "View by" dropdown list in the upper right corner.
The navigation within the control panel is similar to a normal explorer window: There are backward and forward buttons, as well as an address bar.

Libraries are a completely new feature in Windows 7. Libraries let you view and arrange files (pictures, documents, movies, or music files) stored in different locations.
For instance, you can display all pictures that had been taken in the years 2008, 2009, and 2010 in one single window. Some libraries have been predefined by Microsoft. If you open a new explorer window, these libraries are displayed by default. You can create a new library by clicking on the "New Library" button (1) that is displayed in the library view.

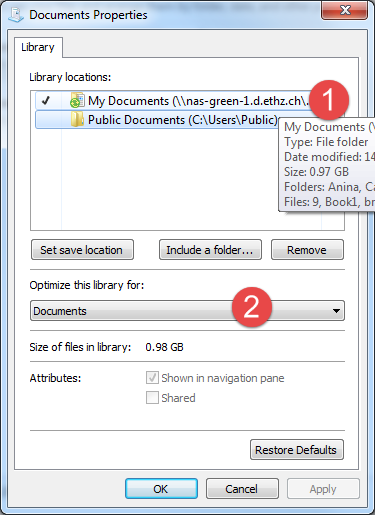
When creating a new library, you have to specify the folders to be integrated (1) as well as the file types that shall be included (2).
PLEASE NOTE: You can only include folders that are indexed by Windows 7. For network drives, this requires that a folder has to be set to be available offline!
DO NOT, UNDER ANY CIRCUMSTANCES, SET THE DRIVE P: TO BE AVAILABLE OFFLINE!!!!
Offline Folders are a technology by Microsoft which aims to make content on a network drive available offline. Whenever you are not connected to the ETH network, you can work on the local copy of the file and as soon as you are connected again, the file will be synced. You can recognize an Offline Folder by the green circle in the folder icon.

As you can se in the screenshot, parts of your userprofile are located on a network drive and made available offline by using offline folders. Users working on a desktop workstation are not concerned by this, since the workstation is always connected to the network.

To make a folder on your network drive available offline (if you need the file(-s) on your laptop), you can do so by right-clicking on the foldername and selecting "Always available offline" in the context menu.
ATTENTION: This functionality is only for use with data on your personal network drive T:. Using the feature on folders in your groups public drive is strictly forbidden!
If you want to map a network drive, open a Windows Explorer window (e.g. by clicking on Start/Computer) and select the shortcut "Map network drive" (1).

A window will open, where you can set the drive's letter (1), the path to the network share (2), as well as the options "Reconnect at logon" and "Connect using different credentials" (3). If you want to reconnect the share after rebooting or next login, check "Reconnect at logon". If you want/have to apply a different username (only necessary in rare exceptions or when mapping from home), activate "Connect using different credentials". Clicking on "Finish" will map the desired share. A list with the most important network paths can be found here


The procedure to search for file contents in Windows 7 is quite different from the procedure in Windows XP. The following steps illustrate how you have to proceed.
1) Open an Explorer Window and navigate to the data structure you want to search through (e.g. t:\)
2) In the upper right corner, enter the words you search for in the search field:

3) After a few seconds, Windows will start to look for data FILENAMES with your search criteria. Unfortunately, you have to wait until the search process has finished:

4) When the search process has finished, click on "File Contents" (see screenshot below). Windows will now start a new search, this time looking WITHIN the files.

5) Files that contain the search criteria will then be listed. This process can take some time...
